

Thursday, 5 June 2014
Setting Up The Display
Today I got my display for my pieces set up. We had some problems with the screws where they didn't fit the slots in the keyhole hook. They could still sit on the wall but they can be knocked off easily. It was easily solved by replacing the screws. With the display set up i could begin arranging my neck pieces upon them. To get my pieces on without it looking too flustered took a few tries. I tried to layer them as the three sizes over lapped each other instead of one on top of the other. As the display are made with flat sheets of plastic they don't have the volume you would with a body meaning the pieces were too long and hung off the bottom of the display. To rectify this I pulled the pieces from behind the neck down the back of the display and clipped it to the frame holding it to the wall. Over all I'm really happy with my display.
Wednesday, 4 June 2014
Finishing Display
Today I've been on the mission to finish making my display to be put up on the wall tomorrow. I already had the body shaped plastic cut out from Monday. All I needed to do today was to make the part that was stuck to the back of the body and joining the wall. James had instructed me to use plastic glue to stick plastic dowels to the back and the dowels with slot into holes in the wall. I was a bit concerned about the glue holding to either side of the dowels and worried that by hanging it up with this process that it might fall off. I talk to Ian in workshop about my intention with the dowels and he informs me that it's not a very sturdy way of hanging. The problem is that the surface area of the dowels glued to the back is too small meaning it won't be strong enough to hold. Also I'd need to get the dowel at perfect right angles and I would risk breaking the bodies by drilling holes in for the dowels to go in. We brainstormed some idea to make the surface larger and finally came to the idea of a frame/bracket that had a square base to glue to the back on the left and right sides of the of the base square were panels bent at right angles away from the base giving the space between the bodies and the wall. Then another two parts folding at right angles away from the panels, parallel to the base square to then be attached to the wall with screws through keyhole shaped holes in the sections. This bracket would be much stronger and ensure that the display is parallel to the wall by using the larger surface areas.
We made the bracket from clear perspex and cut out the shape and etched the lines with the laser cutter. I was able to shape them using the strip heater to melt the plastic along the etched lines to make it malleable toe bend it into right angles. With the brackets made we could glue them using plastic glue onto the back of the bodies making sure they were straight based on the bottom of the bodies.
We made the bracket from clear perspex and cut out the shape and etched the lines with the laser cutter. I was able to shape them using the strip heater to melt the plastic along the etched lines to make it malleable toe bend it into right angles. With the brackets made we could glue them using plastic glue onto the back of the bodies making sure they were straight based on the bottom of the bodies.
Tuesday, 3 June 2014
Spaces
This afternoon I was hanging around the hall to get the go ahead about setting up. During this time who gets what spaces was still being organised. I was asked if space is limited that I may have to only have two items that sit one above the other. I really had my heart set on the three side by side and I personally think a group of three looks better. I am quite set on having all three, but I understand that if there is not the space then it's fine and I will work with what I've got. Hopefully I don't have to but we will see.
Postcard and Business Cards Arrived
I had to wait in this morning for a package to arrive. I am excited to have received my postcards and business cards today. I think they look amazing. I think the image quality could have been better on the postcards but it too late to change anything now and I'm still happy with them.

Monday, 2 June 2014
Making Display
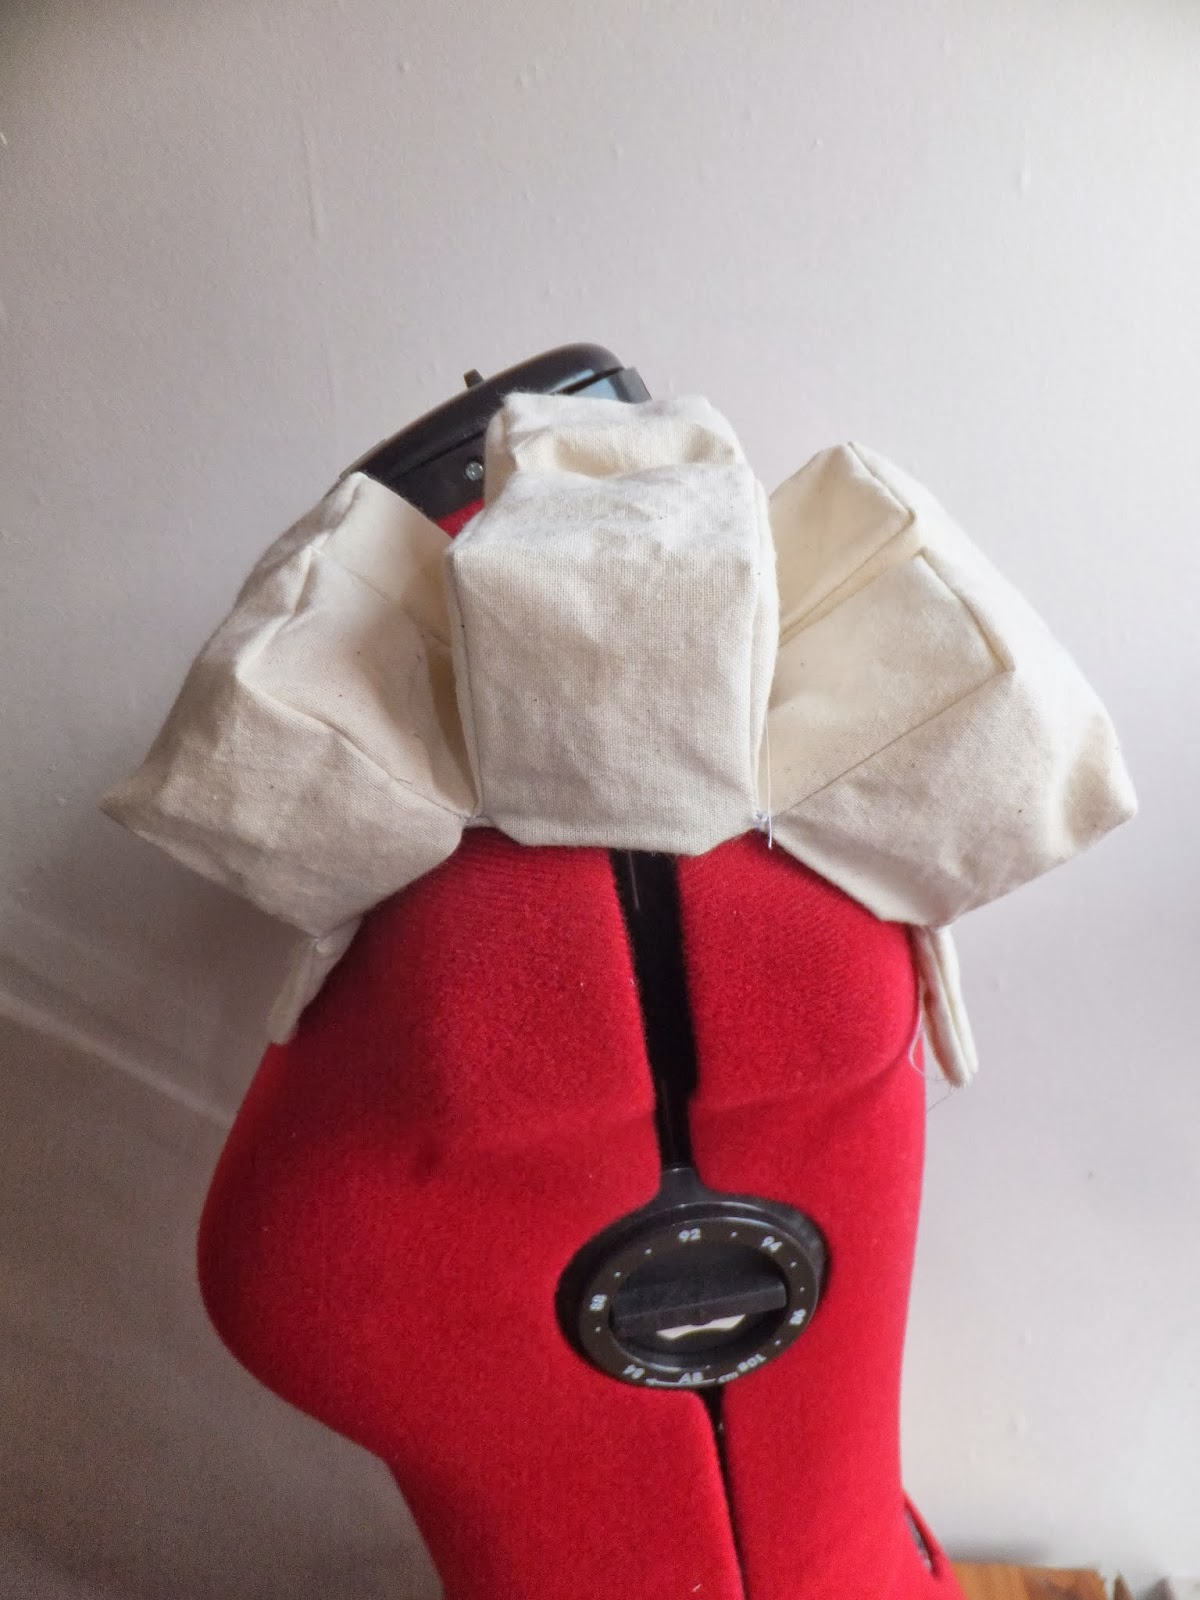
My plastic sheets arrived today for making my display. I got them cut down to fit in the laser cutter at Folly campus and carried them to the workshop at CRC campus to cut out the body shapes on the bigger laser cutter in that workshop. I change my mind on having the hole distinguishing the waist and the arms etched and instead cut it out so that the shape of the body is more obvious and i was worried that if it were etched it wouldn't be as noticeable. I also decided to go with having my logo and name in the bottom corner as I like to see the branding spread across every part of my work. It was a nice feeling to see my name etched out onto the plastic. We had a problem with the letter D in my name with trying to get the space inside the 'D'. After a few attempts to fix it I got there in the end.

Editing Images
This weekend and Friday I have been editing pictures from the photo-shoot last Thursday. I had to cut down on the 400 images and picked out a select few for me to work with. It was difficult to get my head around at first but I've been watching a few Photoshop tutorials and have learnt a few things I can do to change the images. It has took me a while to get through all the images and my desktop is filled with many variations of the same image. I still have loads of more editing to do in preparation for the portfolio and website.
Friday, 30 May 2014
Preparing For Laser Cutting Display
Today I've been playing on Illustrator preparing the file for the laser cutter ready for when my plastic sheets arrive for cutting out my display. I'm having body torso shapes cut out of the plastic. I've made an example piece out of foam board and then scanned it into the computer to use the image as template to follow. I'm thinking of having the gap between the waist and the arms etched but am worried if it's not deep enough then it won't show. I've made two versions of the file, the second one has an additional etch of my logo and name. I think it would be nice to keep my branding on all my work.
Thursday, 29 May 2014
Photo-shoot
I have been in the photo studio all day taking pictures of my pieces. I got some normal pictures and some where I played with the lighting. I use a translucent table and shone a light through illuminating the plastic of my items. During this period I arranged to have a model in to wear my items. I think it's important to see it being worn as on it's own it's not obvious that it's to be worn or how it would look. It's a good thing she was on the ball about posing as I wasn't too sure myself. I did how throw in a few suggestions and got some amazing images. I looked at different distances and angles. we played with the positioning of the item and handling of the item.
Wednesday, 28 May 2014
3rd Final Piece
Friday, 23 May 2014
2nd Final Piece
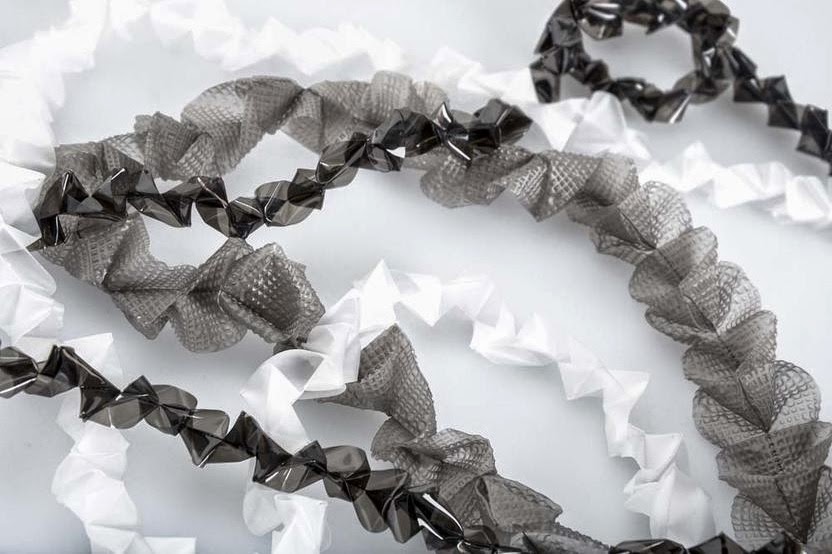
I have chosen a new pattern from my exploration of patterns for my 2nd final piece. I like this pattern as I can see triangles and squares in it. I used the same ratios of how many strips for each width (8 x 5cm, 10 x 3.5cm, 12 x 2.5cm). This time I've used a different colour combination of grey bobbles, clear and black.
Thursday, 22 May 2014
Tutorial: Lisa Porche
Today I had my last tutorial with Lisa Porche. We discuss my final pieces so far, my colour combination and what i plan on doing. she gave me some suggestions on laser cutting some patterns out on the plastic and molding it together with the clear or printing on the plastic. I'm a bit skeptical that they could work as I know they won't let me put plastic in the laser cutting without knowing exactly what its made of and that whether printing on it will stick to material and not smudge and be blotchy. Also with the time I have left I don't think I have the time to test these ideas. During this time I run by her my idea of having some samples with my final piece display for the viewers to be able to touch the material and see how it feels. She suggested to me some ideas for displaying the samples. I will possibly do this if I have the time once the important parts of my work is done.
Friday, 16 May 2014
Finshed 1st Final Piece
After visiting London on Wednesday to get more plastic material I have been able to extend the length of my first final piece. I have been cutting, folding, Stitching and joining for the last day to double the length of the first attempt. This final piece now contains: 8 x 5cm black, 10 x 3.5cm white and 12 x 2.5cm clear. With this doubled I now tested its length on a mannequin to see if it was the right length and am really happy with the results.

Monday, 12 May 2014
First Attempt at Final Piece
I spent all Friday, the weekend and this morning blasting through making my first final piece in time for the photography session. I used 4 x 5cm black, 5 x 3.5cm white and 6 x 2.5cm clear, using up the last of my plastic meaning i need to take another trip to London soon. Once I had finished making it I had to get it the the photography session. During the session I got to apply it to my model. Once I could see it on someone I could see that it was too short for what I was trying to achieve. I was thinking it would cover the whole chest and hang down from there but it was much smaller than imagined and sat above the chest. As of the size of the folds it was too much going on for the wearer and the viewer to have close to the head and that it needs to be lengthened.

Saturday, 10 May 2014
Colour Combinations
I have been looking at and recording colour combinations of my selected favorite plastic colours. I have chosen to specifically use Black, Bobbly Grey, Misty Grey, Misty White and Clear. I have been arranging my samples together in order to find collections of three colours that compliment each other. I have chosen to use:
Black, white, clear
Bobbly grey, clear, black
Grey, clear, white
I needed make sure I didn't have any clashing grey on grey combinations.
Black, white, clear
Bobbly grey, clear, black
Grey, clear, white
I needed make sure I didn't have any clashing grey on grey combinations.
Friday, 9 May 2014
Tutorial: James
Today I had a tutorial with James to talk about how my display is to work. From talking to Lisa Porche last I had decided to use flat cut out plastic to display my work on. Now I need to work out how I am to have the cut out bodies at a display level. Lisa was suggesting having them suspended from the ceiling but in the hall I don't think that is possible and keeping them in the right place would be troublesome. I though of making them a stand for them to sit on plinths but It was suggested by James that it would probably look bulky and unappealing. James suggested the great idea of having them stuck to the wall but sitting away from it leaving a gap between the wall and the plastic. I weren't sure how that would work but he worked out that we could use dowels glued to the back of the plastic to slot into holes made in the wall.
Thursday, 8 May 2014
Joining Plastic
Today I have been considering how I would join my long strips of plastic in a nice way the wouldn't be too noticeable. I tried both stitch and melting the plastic. I fount the stitch ones to be too obvious but the melted one worked really well and as long as I'm careful and do it neatly it won't be very noticeable.
Different Patterns
Lisa advised me that it was important for me to discover different patterns to expand on my ideas. I've been playing with the box pleat and pinning sections together to see what patterns I can make. I've also looked at regular pleats as well to explore what other patterns I can make with them. I think I've made a nice collection of patterns for me to pick out some favorites to use.

Thursday, 1 May 2014
Tutorial: Lisa Porche
My first tutorial after the Easter holidays was with Lisa Porche and I had a lot of things to discuss. We first went over my materials that I was using for my folded formed strings. I was able to identify which materials I liked most and thought worked best. These were:
Through these we talked about my idea to combine come of the different textured or coloured materials together. We both agreed that depending on whether they complement each other then it would be very good as two type of necklace things that are worn together
I had also recently explored varying widths of the chains. I informed her that from my finding that the larger ones are floppy and possibly too large. I'm thinking I would go slightly bigger than the usual size i've been doing possibly a centimeter before it starts looking weak. I had also tried making smaller sized the samples going as small as half of my usual size. I liked these and the changing of size and had decided to test a changing size of the strips to see how that works or consider combining loops of chains into sets of two or three with different thicknesses.
We went into depth about my collection/s for the upcoming final show. It was decided that I could fit three items in my space and that these items will be similar styled items being long chains that loop around the neck like necklaces but with vast quantities. It was advised that to make these different that I should explore different patterns in order to show development and express a variety of skills. I'm thinking that I will have three different patterned adorning items and that because how they are is similar I could change the colours of the materials like black, grey and white to show that they are different patterned as if they were in the same coloured material it could be missed that they are all actually different.
For my final show I need to consider how I am to display my items. I was first considering buying mannequins which means I would have to purchase them now in order for them to arrive on time. Lisa suggested a better idea of displaying by cutting out a human figure from perspex and using that instead of a bulky mannequin. I think this is a better form of display as a mannequin can seem very heavy to look at and is very typical form to think of displaying and when going to New Designers there will be loads of people using mannequins for display. However using a shaped perspex form to display will be different and will not only match my plastic material use but also blend and not distract from the pieces. My only consideration with this now is how the flat sheet of perspex with stand and I will have to explore how to solve this problem.
- shiny black
- geometric textured grey
- matt grey
- clear shiny
- matt white
Through these we talked about my idea to combine come of the different textured or coloured materials together. We both agreed that depending on whether they complement each other then it would be very good as two type of necklace things that are worn together
I had also recently explored varying widths of the chains. I informed her that from my finding that the larger ones are floppy and possibly too large. I'm thinking I would go slightly bigger than the usual size i've been doing possibly a centimeter before it starts looking weak. I had also tried making smaller sized the samples going as small as half of my usual size. I liked these and the changing of size and had decided to test a changing size of the strips to see how that works or consider combining loops of chains into sets of two or three with different thicknesses.
We went into depth about my collection/s for the upcoming final show. It was decided that I could fit three items in my space and that these items will be similar styled items being long chains that loop around the neck like necklaces but with vast quantities. It was advised that to make these different that I should explore different patterns in order to show development and express a variety of skills. I'm thinking that I will have three different patterned adorning items and that because how they are is similar I could change the colours of the materials like black, grey and white to show that they are different patterned as if they were in the same coloured material it could be missed that they are all actually different.
For my final show I need to consider how I am to display my items. I was first considering buying mannequins which means I would have to purchase them now in order for them to arrive on time. Lisa suggested a better idea of displaying by cutting out a human figure from perspex and using that instead of a bulky mannequin. I think this is a better form of display as a mannequin can seem very heavy to look at and is very typical form to think of displaying and when going to New Designers there will be loads of people using mannequins for display. However using a shaped perspex form to display will be different and will not only match my plastic material use but also blend and not distract from the pieces. My only consideration with this now is how the flat sheet of perspex with stand and I will have to explore how to solve this problem.
Wednesday, 30 April 2014
Chaning Scales
I have been exploring different widths of the strips. I can determine what widths work best with the pattern and how the size effects it. I found that the widths bigger than 6cm got floppy and didn't hold the pattern very well. I couldn't go smaller than 2.5cm as it was the smallest I could fit through the sewing machine. I like the 5cm size and the tiny 2.5 size.
I've considered a changing size with the strips and tested fluctuating the width size going along the strip. This could be an interesting aspect to my work.

I've considered a changing size with the strips and tested fluctuating the width size going along the strip. This could be an interesting aspect to my work.
Friday, 28 March 2014
Tutorial: Anna Lewis
Anna Lewis gave me some interesting suggestions in my tutorial. With my problem using woven materials and that they are fraying she told me that when using synthetic fabrics if I were to cut them on the laser cutter the heat would melt the plastic content and seal the edges. This is another process for me to try.
She gave me a list of suppliers of materials for which I should look at. Also recommending that I could look at Tyvek as a material, apparently it’s a mix between plastic and paper where it will have the qualities of paper but does not tear and can be stitched, folded, cut and dyed. She was insistent on me trying leather and helpful with with how I should handle the leather and the types of needles I would need to sew into leather and that I possibly need thinner leather to create a crisp fold.
She gave me a list of suppliers of materials for which I should look at. Also recommending that I could look at Tyvek as a material, apparently it’s a mix between plastic and paper where it will have the qualities of paper but does not tear and can be stitched, folded, cut and dyed. She was insistent on me trying leather and helpful with with how I should handle the leather and the types of needles I would need to sew into leather and that I possibly need thinner leather to create a crisp fold.
Thursday, 27 March 2014
Formative
Today I had my formative assessment on my current project. We discussed
that I need to strongly progress with sampling. For my sampling I need to
consider a range of materials. So far I've found problems looking at regular
woven materials. As I want to use strips of fabric using ways of fixing the
edges through over locking or folding will make it look poor and scruffy. It
was suggested to me to use ribbon like materials where the edges of the woven
material are woven within the sides. However I think ribbon like materials that
I've seen looks a bit tacky and unappealing. I need to find a non-woven fabric
meaning there is no weft for it to fray. I've been considering materials like
leather and pvc. After talking to the textile tutors and doing some exploring
it would be better to work in a plastic material. I can try a range of
different plastic materials. I've struggled to find any decent suppliers online
for pvc. It has been recommended to look at a shop in London.
This shop is said to have a bigger range of plastic materials and are of a high
fashion quality. To explore these types of fabrics I would have to make a
special trip to London to go to the shop to purchase plastic materials for me
to use.
Thursday, 20 March 2014
Tutorial: Lisa Porch
I had a tutorial with Lisa Porch, we began by looking at my artist
research. She was able to distinguish between my choices of folded forms and
strips of shape. We discussed the progression of samples that I could take with
my project. By looking at my artist research we brainstormed some ideas for
samples to make. We focused on samples that involved using strips of patterns
and combining them into a finished piece. I'm going to look at fabric
manipulation books and see how they can transform strips into shapes and form. I’m
going to look at Ruth Singer's fabric manipulation book focuses on ribbon
folding. I will return to Paul Jackson’s folding techniques for paper and enquire
how I can translate these techniques into a fabric like material. We briefly
discussed materials as I was unsure about how to handle leather. I'm not scared
to use it now as I am aware that I can leave the edges clean cut and seams out.
Thursday, 13 March 2014
Artist Research
I've spent a week looking at artists that use both repetition of line and form that apply it to the body in an adorning manner. I specifically chose these artists because I believe they show similar themes to my own that I am trying to achieve. I've focused on applications that are on the upper half of the body that sit or hang on the shoulders. By looking at these artist's and their work it will inform my own samples and how I could apply my ideas/samples to the body. I began my research looking at Bea Szenfeld, specifically one of her items where she had created a long string of formed paper and wrapped it around the wearer's neck creating a statement piece by it being so large. From looking through the range of images I had collected I can find two types of styles within my choices. The first is that they use folds to create form from one flat piece and the second is that they use repeated patterns in long strips to create the piece. All of the artists I've looked at fall into either of these groups but all using different materials and in different ways. I have them all collected in a pinterest folder.

Wednesday, 12 March 2014
Op Art Line Drawings
The patterns of line drawings i did influenced me to try drawing with lines
on illustrator. I can get a crisper line and a greater contrast between black
and white. Again each line drawing influenced the next line drawing showing progression
of my pattern making. I noticed that some of these drawings showed signs of
Optical illusions, much like Op Art. I looked at Op Art and Bridget Riley's
work as found a similar style. Some Op Art uses only black and white as the
contrast between the two colours is greater than any other, allowing the illusion
to be visually stronger. I found out that my Op drawings are similar to
periodic structure Op Art. Periodic structures are defined by a function that
repeats the same values at regular intervals, as the variable increase and
decrease uniformly.


Sunday, 9 March 2014
Line Patterns
After drawing from the building I wanted to make my own drawings of line
and looking at the patterns that can be made with multiple lines. Each drawing
inspired the next drawing. I'm interested to see what these might look like or inspire on a computer with a crisper line. I think some of these drawings can show a different type of image when looked at and concentrated on differently.


Friday, 7 March 2014
Initial Drawing of Architecture
For this new project I have started by looking at architecture again. I've found images online of architecture that I liked showing repetition of line in the structure of the buildings/architecture. I have drew from these images showing the repeating lines and form. These drawings are the starting point of my process and by exploring these through drawing I can imagine different patterns that can be found.


Wednesday, 5 March 2014
New Project
For my new project I am going to continue to manipulate
fabric in a similar way to my last project with folds and repetition of lines.
However I am not going to be looking at making fitted clothing and am going to
focus on making adorning items that hang from the body. I am going to explore
variations of my previous samples considering different scale and materials.
Monday, 3 February 2014
Fabric Choices
I had ordered some fabric samples from a fabric supplier. From these samples I will be able to tell which fabric I'd like best for my final garment. I've particularly looked at heavy weighted fabric as I found from working with both medium and heavy calico and medium pillow cotton that the heavy calico worked best to hold the folded form. I have looked at cotton satin heavy, viscose satin heavy, drill cotton satin, viscose cotton rib and cambric cotton heavy for white fabrics and drill cotton, cotton satin duchesse, domette cotton and coutil viscose satin (cotton backed) for black fabrics.
I was considering either the satin cotton heavy or the drill cotton. In the end I chose the satin cotton as even though there wasn't a great difference between the two I was rather fond of the feel of the fabric as it was much smoother than the drill. As there was not black satin cotton I chose the black drill cotton. I think they would be okay together as the density is very similar. I could have dyed some of the satin cotton heavy black but it would take longer to prepare and uncertain whether it would dye properly. I couldn't risk it going wrong, so it was much easier to buy black material than to prepare it myself.
I wanted to use a cotton based lining fabric as I didn't like the synthetic lining fabric I used for my samples. I did some research and found that silesia cotton is commonly used for lining.
I've ordered 3m of satin cotton heavy, 1m of black drill cotton and 2m of silesia cotton.
Friday, 31 January 2014
Hems, Seams and Zips Workshop
Today me and two others had a workshop in some of the basics of pattern drafting and garment making. We focused on hems, seams and zips. I found this workshop to be incredibly informative and what I learnt will inform the making process of my final piece. We explored a range of different seams, two types of zips and button holes. I created a range of samples for my technical diary.

Thursday, 30 January 2014
Tutorial: Lisa Porch
I had an amazing tutorial with Lisa Porch today. I've completely changed some of my ideas for my works. We both weren't feeling the blue was working on my samples and worked out that it was because it was really bright and took away from the texture. She described it that to really enphasize the texture you need to limit the colour. So from looking at my source images of architecture it seemed obvious to use both Black and white tones. Also she suggested a better way for me to add the colour parts. Instead of printing the colour onto the white, I could piece the coloured parts in like patch work. This would be much easier than trying to get a perfect print and wasting a lot of fabric if it were to go wrong.
Friday, 24 January 2014
Colour Trend Spring '14
Now that I know I would like two colours in garment I've been looking at currrent trends of colour for spring 2014. I have done some research and found that Pantone was a reliable source for advisers of season's colour trends.


I think I'm most interested in the white with placid blue additions or placid blue with violet tulip. I wanted to keep my colours pale and pastel as I think too strong a colour would distract or take away from the form.
I have been in the workshop for the last two days learning how to dye fabrics. I've been playing with the concentration of dyes in order get a match closest to placid blue.
Tuesday, 21 January 2014
Adding Colour
I've been exploring the addition of colour to my samples. I am mostly interested in my sprouting fold samples, so I have chosen to experiment with colour on these. I have considered adding colour to the whole fold to stand out from the rest of the adorning item, colour on the outside leaving the inside of the fold blank and colour on the inside of the fold leaving the outside blank. I think the addition of another colour is really interesting and adds another layer of texture, picking out the form in the fabric. I was most impressed with how the colour on the inside turned out. I liked how from some perspectives you can't see the colour but also see the colour reflect on the white fabric, almost like a glow. I quite like this addition to my work that it changed from the different angles in which you look at it. I believe its the same with the form too, that the way it looks can be changed from the angle you are facing it. I only screen printed these with a stencil so the print quality is quite poor. For the real thing I would have a screen exposed to get a perfect print of colour.


Saturday, 18 January 2014
Sprout Waves
I have arranged to half of each sprout oppositely in three channels to make a wave with the folds. I flipped round some sprouts and moved them over to be diagonally crossing in the same direction. I find this piece rather interesting but I don't see it on the body, I do however could see it with multiples of folds and as a wall piece or framed. I may reconsider with it on the body but with not as many, possibly just a chain of two waves.
Friday, 17 January 2014
Multiple Angled 'Sprout'
Today I carried on from my 'Spouting' sample where I had changed the angle and made a new sample with the same technique but this time I've created a line of multiple. I'm really fond of this technique and the way it looks when it curves and bends. I've been looking at current trends and strong geometric folds are very popular right now in S/S14 collections. These types of samples are are going to fit in really nicely.


Wednesday, 15 January 2014
Fabric Search
Today I have focused on what type of fabric I may want to use for my final piece. I know that I will need thick fabric as I have found from my samples that they have worked better with the heavy calico than the medium calico as the heavy material holds its shape better. I went to the workshop to look through fabric samples and to the local fabric shops to see what they had to offer. I had no luck with the fabric shops but had a few fabrics I was considering from the fabric samples from Whaleys, they had at the workshop. I will have to dye my fabric the colours I want it but I am much happier doing that as I can ensure that I get the colour I want rather than having to use a found coloured fabric.
.jpeg)
.jpeg)
.jpeg)
Friday, 10 January 2014
Sample Placement Ideas
I spent all day working with my samples, placing them in different positions on my mannequin and documenting each idea I had for where my fabric shapes could be placed. I came up of all sorts of variation and different places. I found myself in the end mostly interested in placing things on the shoulders or hips. These are a select few of the images I made with them.


Thursday, 9 January 2014
Angle Change on 'Spouting' Sample
Today I followed on from my 'Sprouting' samples. I reworked the pattern and changed the angle that the fold comes out. It comes out to more of a point this time. I'm rather fond of this sample, and again I want to create a line of multiples of this to see how they sit together.


Tutorial with James
I had another tutorial with James today. We talked about what my plans were for the rest of the time before summative and what I can achieve within the time. We also discussed the problems I've been having with documenting my work and designing. I was recommended to take lots of photos. I should pin my samples onto a mannequin in places to spark ideas of where they could go and this will feed into my designing. I showed him my new samples and it seems like I'm really on the right tracks to something good.
Wednesday, 8 January 2014
Revised and Diagonal Tucks
I wanted to revisit my previous work of tucks and again create multiples all straight and uniform. This time when I made the tucks I didn't sew each fold, I folded it first and then sewn a line of straight flat fabric along the folded edge to keep the folds secure. Inspired by my 'Sprouting' samples I wanted to try two lots of tucks diagonally coming together into a point. I was interested by how it would form and whether it was possible to put two lots of tucks together. I was very impressed with how they came out its worked very nicely.


Sprouting Samples
Today I have been working on a new type of sample, moving away from the fabric cubes. Looking through the pattern magic books again I found a style they called 'Sprouting' or 'Nyokitto'. From looking at the images it didn't look like much. I just looked like extra fabric hanging from the body. However when I tried it for myself I was quite surprised and excited by what I had made. Using only two pieces of material I made fold that grows out of the flat fabric. From this one sample I needed to try multiples in a row, I knew that it was going to work so well together with multiple lines of folds. It was much more difficult to make a multiple line as the pattern curves round in a circle with too many of the folds. I think 5 or 6 would be the most I could do without the pattern going over itself. I could probably rectify this if i wanted more by cutting the pattern into pieces and having seams on the insides of the folds to be hidden. I want to play with this some more, move the folds around see how the fit together with other folds in different positions and change sizes and lengths.


Subscribe to:
Posts (Atom)