
Friday, 30 May 2014
Preparing For Laser Cutting Display
Today I've been playing on Illustrator preparing the file for the laser cutter ready for when my plastic sheets arrive for cutting out my display. I'm having body torso shapes cut out of the plastic. I've made an example piece out of foam board and then scanned it into the computer to use the image as template to follow. I'm thinking of having the gap between the waist and the arms etched but am worried if it's not deep enough then it won't show. I've made two versions of the file, the second one has an additional etch of my logo and name. I think it would be nice to keep my branding on all my work.
Thursday, 29 May 2014
Photo-shoot
I have been in the photo studio all day taking pictures of my pieces. I got some normal pictures and some where I played with the lighting. I use a translucent table and shone a light through illuminating the plastic of my items. During this period I arranged to have a model in to wear my items. I think it's important to see it being worn as on it's own it's not obvious that it's to be worn or how it would look. It's a good thing she was on the ball about posing as I wasn't too sure myself. I did how throw in a few suggestions and got some amazing images. I looked at different distances and angles. we played with the positioning of the item and handling of the item.
Wednesday, 28 May 2014
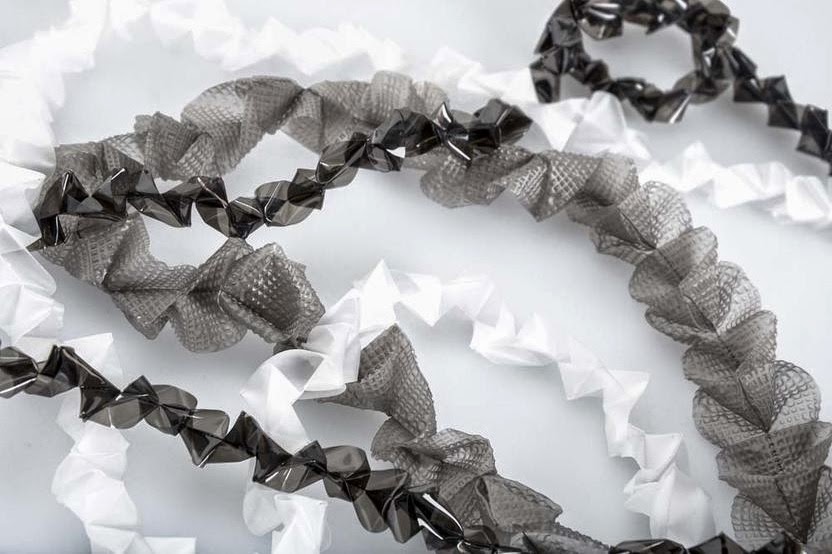
3rd Final Piece
Friday, 23 May 2014
2nd Final Piece
I have chosen a new pattern from my exploration of patterns for my 2nd final piece. I like this pattern as I can see triangles and squares in it. I used the same ratios of how many strips for each width (8 x 5cm, 10 x 3.5cm, 12 x 2.5cm). This time I've used a different colour combination of grey bobbles, clear and black.
Thursday, 22 May 2014
Tutorial: Lisa Porche
Today I had my last tutorial with Lisa Porche. We discuss my final pieces so far, my colour combination and what i plan on doing. she gave me some suggestions on laser cutting some patterns out on the plastic and molding it together with the clear or printing on the plastic. I'm a bit skeptical that they could work as I know they won't let me put plastic in the laser cutting without knowing exactly what its made of and that whether printing on it will stick to material and not smudge and be blotchy. Also with the time I have left I don't think I have the time to test these ideas. During this time I run by her my idea of having some samples with my final piece display for the viewers to be able to touch the material and see how it feels. She suggested to me some ideas for displaying the samples. I will possibly do this if I have the time once the important parts of my work is done.
Friday, 16 May 2014
Finshed 1st Final Piece
After visiting London on Wednesday to get more plastic material I have been able to extend the length of my first final piece. I have been cutting, folding, Stitching and joining for the last day to double the length of the first attempt. This final piece now contains: 8 x 5cm black, 10 x 3.5cm white and 12 x 2.5cm clear. With this doubled I now tested its length on a mannequin to see if it was the right length and am really happy with the results.

Monday, 12 May 2014
First Attempt at Final Piece
I spent all Friday, the weekend and this morning blasting through making my first final piece in time for the photography session. I used 4 x 5cm black, 5 x 3.5cm white and 6 x 2.5cm clear, using up the last of my plastic meaning i need to take another trip to London soon. Once I had finished making it I had to get it the the photography session. During the session I got to apply it to my model. Once I could see it on someone I could see that it was too short for what I was trying to achieve. I was thinking it would cover the whole chest and hang down from there but it was much smaller than imagined and sat above the chest. As of the size of the folds it was too much going on for the wearer and the viewer to have close to the head and that it needs to be lengthened.

Saturday, 10 May 2014
Colour Combinations
I have been looking at and recording colour combinations of my selected favorite plastic colours. I have chosen to specifically use Black, Bobbly Grey, Misty Grey, Misty White and Clear. I have been arranging my samples together in order to find collections of three colours that compliment each other. I have chosen to use:
Black, white, clear
Bobbly grey, clear, black
Grey, clear, white
I needed make sure I didn't have any clashing grey on grey combinations.
Black, white, clear
Bobbly grey, clear, black
Grey, clear, white
I needed make sure I didn't have any clashing grey on grey combinations.
Friday, 9 May 2014
Tutorial: James
Today I had a tutorial with James to talk about how my display is to work. From talking to Lisa Porche last I had decided to use flat cut out plastic to display my work on. Now I need to work out how I am to have the cut out bodies at a display level. Lisa was suggesting having them suspended from the ceiling but in the hall I don't think that is possible and keeping them in the right place would be troublesome. I though of making them a stand for them to sit on plinths but It was suggested by James that it would probably look bulky and unappealing. James suggested the great idea of having them stuck to the wall but sitting away from it leaving a gap between the wall and the plastic. I weren't sure how that would work but he worked out that we could use dowels glued to the back of the plastic to slot into holes made in the wall.
Thursday, 8 May 2014
Joining Plastic
Today I have been considering how I would join my long strips of plastic in a nice way the wouldn't be too noticeable. I tried both stitch and melting the plastic. I fount the stitch ones to be too obvious but the melted one worked really well and as long as I'm careful and do it neatly it won't be very noticeable.
Different Patterns
Lisa advised me that it was important for me to discover different patterns to expand on my ideas. I've been playing with the box pleat and pinning sections together to see what patterns I can make. I've also looked at regular pleats as well to explore what other patterns I can make with them. I think I've made a nice collection of patterns for me to pick out some favorites to use.

Thursday, 1 May 2014
Tutorial: Lisa Porche
My first tutorial after the Easter holidays was with Lisa Porche and I had a lot of things to discuss. We first went over my materials that I was using for my folded formed strings. I was able to identify which materials I liked most and thought worked best. These were:
Through these we talked about my idea to combine come of the different textured or coloured materials together. We both agreed that depending on whether they complement each other then it would be very good as two type of necklace things that are worn together
I had also recently explored varying widths of the chains. I informed her that from my finding that the larger ones are floppy and possibly too large. I'm thinking I would go slightly bigger than the usual size i've been doing possibly a centimeter before it starts looking weak. I had also tried making smaller sized the samples going as small as half of my usual size. I liked these and the changing of size and had decided to test a changing size of the strips to see how that works or consider combining loops of chains into sets of two or three with different thicknesses.
We went into depth about my collection/s for the upcoming final show. It was decided that I could fit three items in my space and that these items will be similar styled items being long chains that loop around the neck like necklaces but with vast quantities. It was advised that to make these different that I should explore different patterns in order to show development and express a variety of skills. I'm thinking that I will have three different patterned adorning items and that because how they are is similar I could change the colours of the materials like black, grey and white to show that they are different patterned as if they were in the same coloured material it could be missed that they are all actually different.
For my final show I need to consider how I am to display my items. I was first considering buying mannequins which means I would have to purchase them now in order for them to arrive on time. Lisa suggested a better idea of displaying by cutting out a human figure from perspex and using that instead of a bulky mannequin. I think this is a better form of display as a mannequin can seem very heavy to look at and is very typical form to think of displaying and when going to New Designers there will be loads of people using mannequins for display. However using a shaped perspex form to display will be different and will not only match my plastic material use but also blend and not distract from the pieces. My only consideration with this now is how the flat sheet of perspex with stand and I will have to explore how to solve this problem.
- shiny black
- geometric textured grey
- matt grey
- clear shiny
- matt white
Through these we talked about my idea to combine come of the different textured or coloured materials together. We both agreed that depending on whether they complement each other then it would be very good as two type of necklace things that are worn together
I had also recently explored varying widths of the chains. I informed her that from my finding that the larger ones are floppy and possibly too large. I'm thinking I would go slightly bigger than the usual size i've been doing possibly a centimeter before it starts looking weak. I had also tried making smaller sized the samples going as small as half of my usual size. I liked these and the changing of size and had decided to test a changing size of the strips to see how that works or consider combining loops of chains into sets of two or three with different thicknesses.
We went into depth about my collection/s for the upcoming final show. It was decided that I could fit three items in my space and that these items will be similar styled items being long chains that loop around the neck like necklaces but with vast quantities. It was advised that to make these different that I should explore different patterns in order to show development and express a variety of skills. I'm thinking that I will have three different patterned adorning items and that because how they are is similar I could change the colours of the materials like black, grey and white to show that they are different patterned as if they were in the same coloured material it could be missed that they are all actually different.
For my final show I need to consider how I am to display my items. I was first considering buying mannequins which means I would have to purchase them now in order for them to arrive on time. Lisa suggested a better idea of displaying by cutting out a human figure from perspex and using that instead of a bulky mannequin. I think this is a better form of display as a mannequin can seem very heavy to look at and is very typical form to think of displaying and when going to New Designers there will be loads of people using mannequins for display. However using a shaped perspex form to display will be different and will not only match my plastic material use but also blend and not distract from the pieces. My only consideration with this now is how the flat sheet of perspex with stand and I will have to explore how to solve this problem.
Subscribe to:
Posts (Atom)